The cloud server is becoming more popular and there are many big companies such as Google, Amazon, and IBM, starting to go into the web server market. So what is so good about having a cloud server?
The Benefits of Having a Cloud Server:
- You can easily upscale and downscale your server’s capacity at any time.
- You will only pay for what you use. There are no commitments like the traditional web-hosting, which usually comes with a 1-year plan. With a cloud server, you can choose to stop your server at any time and pay for the duration that you’ve used.
- Your website will load and deliver to your users faster depending on their location and the virtual machine nearest to them.
- Minimise downtime of your website. When one of your virtual machines is down, the cloud server will deliver your website from another virtual machine nearest to your users.
The Disadvantages of Having a Cloud Server:
- It can be costly depending on your configurations.
- Difficult to set-up (if you are new to web hosting).
If you still think cloud server is for you, below are the guide on how you can set-up your very own cloud server. We’ll be using the most popular cloud server called Google Cloud Platform by Google.
Step 1: Setting Up Google Cloud Platform
You will need to have a Google account to begin. If you do not have any Google account yet, you can simply sign-up for it, which will take less than a few minutes.
Once you have an account with Google, go to Google Cloud Platform and click on “Get Started for Free”.

If this is your first time in Google Cloud Platform, you are required to fill in some details with regards to your account like the screen below:
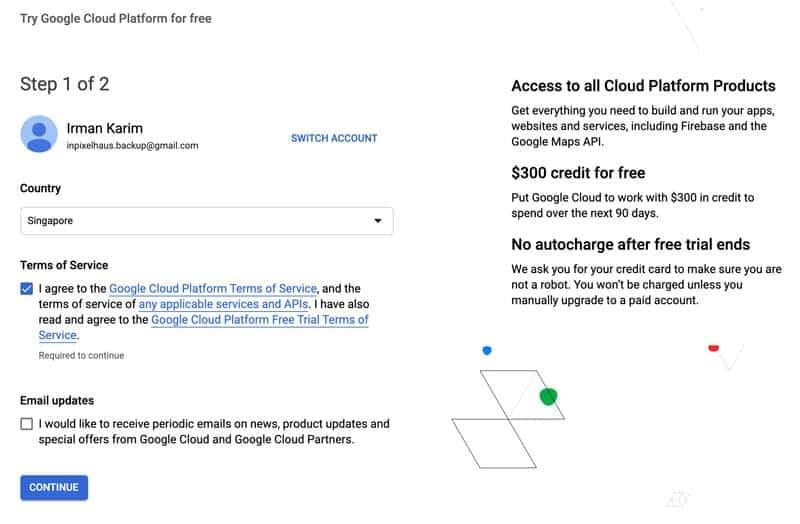
Step 1:
- Choose a country
- Accept the term of service
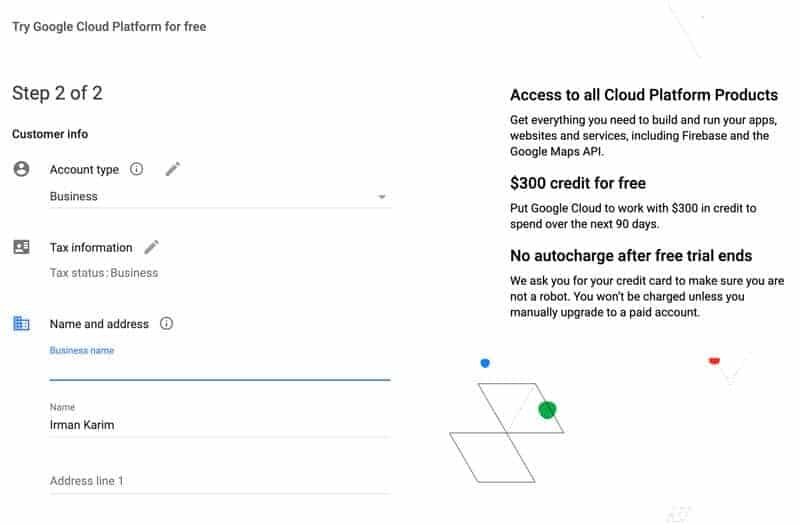
Step 2:
- Choose account type (individual or business)
- If you are a GST-registered company, enter your GST registration number under tax information
- Enter your name, address, and phone number
- Enter your debit or credit card information (you will be given US$300 credit which is to be utilised within 90 days. Your debit or credit card won’t be charged unless you upgrade to a paid account after you have used up all your credits)
Do note that all billing in Google Cloud Platform is in US Dollars.
Step 2: Create an Instance on Google Cloud Platform

On the left panel, click on Compute Engine > VM instances. Then click “Create”.

Name: Give your instance a name (must be in lowercase)
Region: Choose a location for your instance. This is important as you would want to choose a location that is closest to your website visitors.
Zone: Let Google Cloud Platform to automatically choose a zone for you based on your location. You can change to another zone if you wish. For us, we’ll just leave it.
Machine Configuration: For a simple website, you can use the basic configuration. In future, if you need to scale-up, you can always change the configuration at any time.
Boot Disk: Change this to Ubuntu with version Ubuntu 18.04 LTS.
Firewall: Select both HTTP and HTTPS.
Do note that your monthly bill will reflect on the right column whenever you change a configuration. This will allow you to estimate the billing at the end of each month.
Once you are satisfied with the configurations, click “Create”.
Step 3: Reserve Static IP Address on Google Cloud Platform

On the left panel, click on the burger icon and scroll down to select VPC network > External IP addresses.

By default, the type is set to Ephemeral. Click on it and choose “Static”. A pop-up window will appear for the static IP configuration. Simply give it a name and click “Reserve”.
Step 4: Add Your Domain to Google Cloud Platform

On the left panel, click on the burger icon and scroll down to select VPC network > External IP addresses. Then click “Create Zone”.
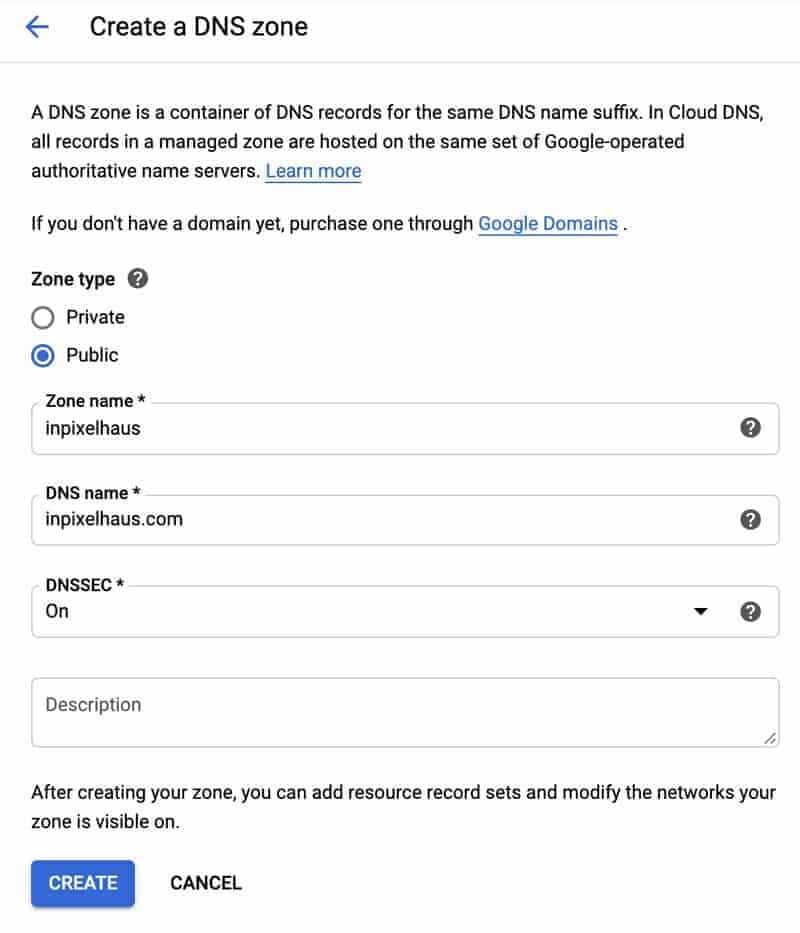
Zone Type: Public
Zone Name: Define a name for your domain
DNS Name: Your domain name
DNSSEC: On
Click “Create”.
The next step is to add a few records in your DNS Zone. Click “Add Record Set”.
Leave it blank for DNS Name and Choose “A” from Resource Record Type and put in your instance external IP address that you have created in Step 2. To find out your external IP address, you can go back to Compute Engine > VM Instances.
Add another record set but this time, put in “www” (without quote) in the DNS Name and put in your instance external IP address like how you just did above.
Next, go to your registrar (where you bought your domain) and change the name servers to the one shown in your zone details. Once you have changed the name servers with your registrar, it may take some time for it to propagate, usually within 48 hours. But based on my experience, it usually takes a few minutes with Google Cloud Platform.

Step 5: Install Apache Package on Google Cloud Platform

Now that you have configured your Google Cloud Platform, we need to install Apache package. Go back to Compute Engine > VM Instances and click on “SSH” dropdown. Select “Open in browser window”.
Once the window has loaded, run this command:
sudo apt-get update
Once done, run the next command:
sudo apt-get install apache2 php libapache2-mod-php
When prompted “Do you want to continue? [Y/n]”, key in “Y”.
Once completed, keep the window open for the next step on installing MySQL package on Google Cloud Platform.
Step 6: Install MySQL Package on Google Cloud Platform
Run this command:
sudo apt-get install mysql-server
When prompted “Do you want to continue? [Y/n]”, key in “Y”.
Once done, run the next command:
sudo mysql_secure_installation
When prompted “Press y|Y for Yes, any other key for No”, key in “Y”.
You will then be prompted for the password security level. You can choose any options:
0 for Low
1 for Medium
2 for High
We will use medium, so we’ll key in “1”.
You will be asked to key in your password and re-enter the password. Do remember or safe-keep your password as you may need it in the future.
Once done, there will be a confirmation on whether you would like to continue with the password. Key in “Y” to proceed.
Remove anonymous users? Key in “Y”.
Disallow root login remotely? Key in “Y”.
Remove test database and access to it? Key in “Y”.
Reload privilege tables now? Key in “Y”.
Congratulations, you have now successfully installed the Apache and MySQL package to your Google Cloud Platform.
Keep the window open for the next step which is to create a database and user.
Step 7: Create Database & User
Run this command:
sudo mysql -u root -p
Enter the password that you just created in the previous step.
Run this command:
create database [db_name];Where [db_name] is the name of your database that you would like to define.
Run this command:
grant all privileges on [db_name].* TO '[db_user]'@'localhost' identified by '[password]';Where [db_name] is the name of your database, [db_user] is the name of your user, and [password] for the user that you would like to define.
Once successful, you may exit mysql by running this command:
exit
Keep the window open for the last step which is to install PHP MySQL.
Step 7: Install PHP MySQL
Lastly, we need to install PHP MySQL.
Run this command:
sudo apt-get install php7.2-mysql
Once completed, we need to restart the Apache by running this command:
sudo service apache2 restart
Once completed you may close the window by using this command:
exit
That is it! Now your Google Cloud Platform server is configured.