
Digital marketing is all about tracking the amount of money you spent to get the number of leads or conversions it generated. These figures are critical for you to evaluate the effectiveness of your campaign. Therefore, big players such as Facebook have created a tool called “Facebook Pixels” to assist marketers to track their return on investments (ROIs).
In this article, we will be guiding you on how you can create Facebook Pixels from your Facebook Business Manager and how to correctly install it on your website. Facebook Pixels allow you to understand the actions your users took and how they behave when browsing your website.
Setting up Facebook Pixels on your website is easy and all you need is a website for your business and an access to your website’s code.
Step 1: Login to Your Facebook Business Manager Account

Log in to your account using Facebook Business Manager. If you don’t have an account with Facebook Business Manager, you can create an account to keep your pages and advertising accounts organised.
Step 2: Get Facebook Pixels Code
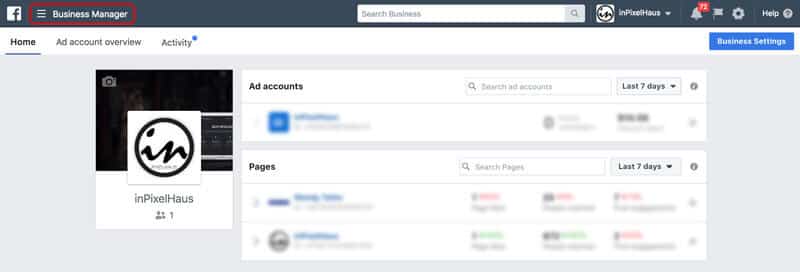
Once you are logged-in, navigate to “Pixels” by clicking on the “burger icon” located at the top left corner of the page (marked in red).
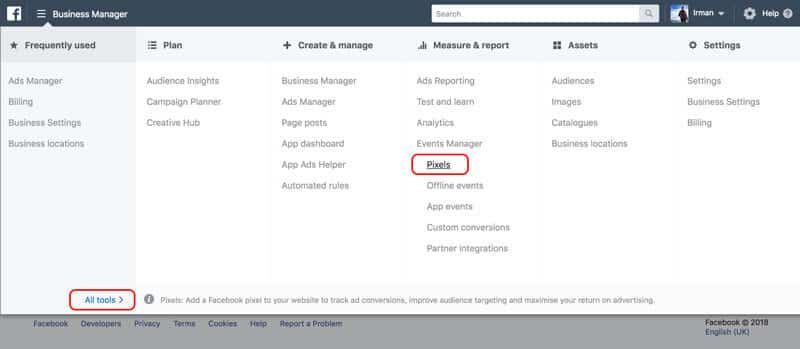
Click on “All Tools” and select “Pixels” under Events Manager.
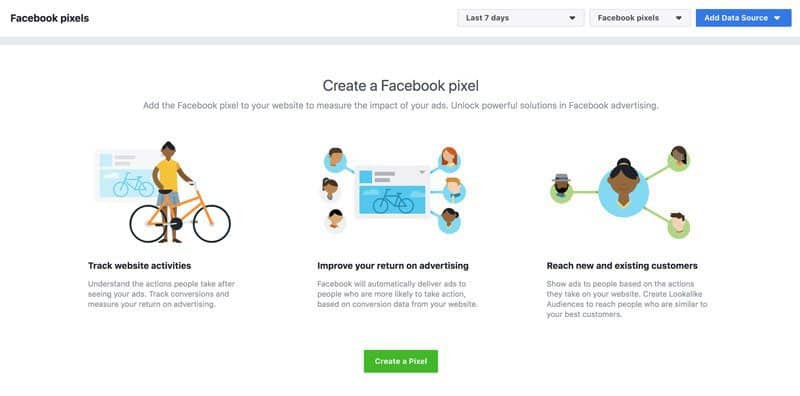
Click on “Create a Pixel”
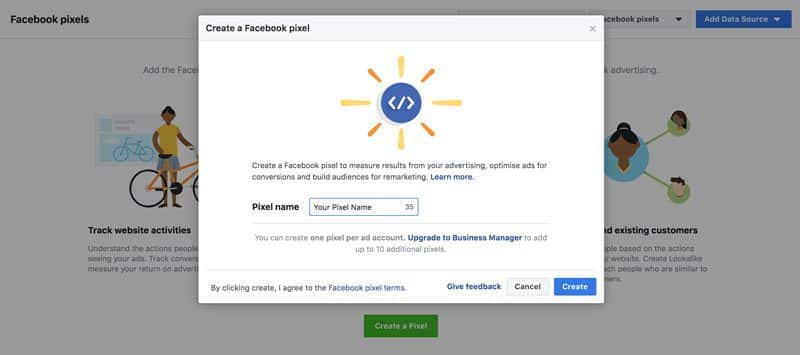
Give a name to your “Facebook Pixel”
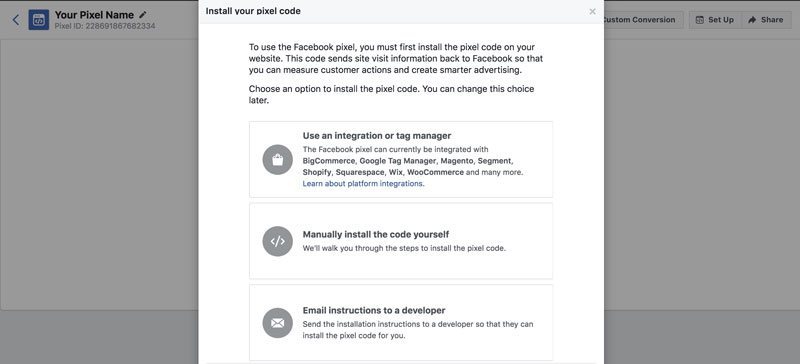
There are 3 methods on how you can install your Facebook Pixel.
- Use an integration or tag manager
- Manually install the code yourself
- Email instructions to a developer
Use an integration or tag manager
If you are using a third-party application for your websites, such as BigCommerce, Google Tag Manager, Magento, Segment, Shopify, Squarespace, Wix or Woocommerce, you can simply follow the step-by-step instruction on how you can install it via the various APIs.
Manually install the code yourself
If you have the access to your website’s files, you can use this method and for the purpose of this post, we will use this method to guide you on where you can place your “Facebook Pixel” on your website.
Email instructions to a developer
You can use this method if you have a developer or webmaster who manages your website on your behalf. Basically, this method will allow Facebook to email your developer the “Facebook Pixel” code for them to install it for you.
Once you select the second option, which is to “Manually install the code yourself”, you will be presented with the pixel code so that you can simply copy and paste the code in between <head>…</head> section of your website’s file.
Once you have copied the “Facebook Pixel” code, click “Continue” to proceed to the next step of the installation process.
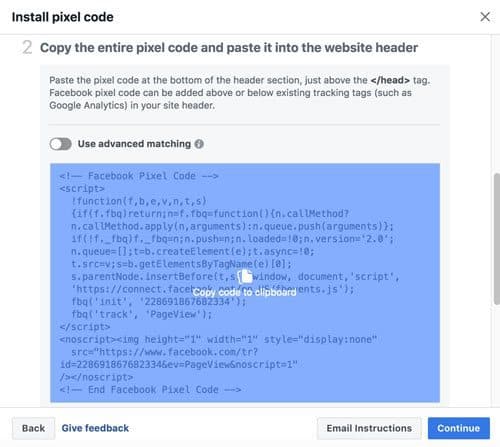
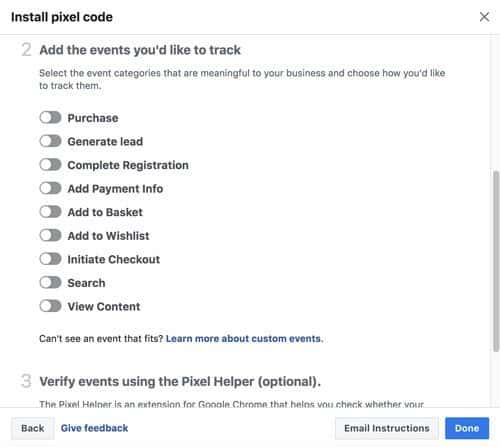
The code above is just the basic code you will need to install on all of your web pages. If you are running a campaign on Facebook and would like to track the effectiveness of your campaign, there would be an additional code required to add to your website. Simply select the type of events you would like to track and a set of instructions will be available for you to follow in order to track your Facebook advertising campaigns. This event code will be explained in Step 4.
Step 3: Install Facebook Pixels Code on WordPress Website
Install via WordPress:
Login to your WordPress dashboard and go to “Appearance > Editor”. Navigate to your header file (usually it is called header.php, but it may vary depending on your WordPress theme) and paste your “Facebook Pixel” code in between <head>…</head> section. Click “Update File” and it is done!
If you are unable to see the “Editor” menu, you may not have the administrator rights to edit your website via WordPress. You need to contact your web developer or webmaster to grant you the access.
Install via FTP (File Transfer Protocol):
Alternatively, you may also install the “Facebook Pixel” code directly via FTP (File Transfer Protocol). Navigate to your child theme and locate the header.php file. However, if header.php is in your parent theme, do copy it over to your child theme because the key to customize your WordPress is always via the child theme.
Once you are in your header.php file, locate the <head>…</head> section and paste your “Facebook Pixel” code in between the head tag.
Step 4: How to Use Events Code
Let’s just say you want to track users’ registration on your website, you can choose the “Complete Registration” option. There are two methods to install the event code, either by Page Load or Inline Action.
Page Load
You may choose this option if you have a page that redirects users after they have completed the registration form on your page such as a “Thank You” page.
For Page Load method, you can place the additional code below <body> tag of your redirected page (eg. thank you page). Why must this only be on the redirected page? This is because we want to trigger the event code only when users has successfully submitted the registration form.
Inline Action
However, if your registration page doesn’t redirect users after they have submitted the registration form, you can use the Inline Action method.
This method will allow you to add code between script tags such as a button and will trigger when a user clicked on the button. Such button could be the “Submit” button or even “Add to Cart” button.
How to Know If You Installed Facebook Pixels Correctly?
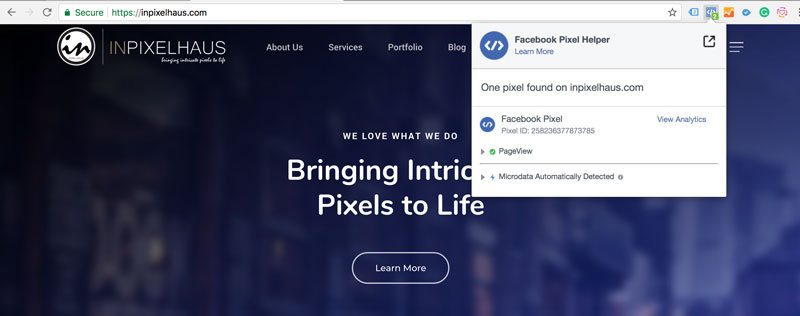
You can install Facebook Pixel Helper, an extension from Google Chrome, to view if you have configured your “Facebook Pixel” correctly.


