Website Speed is defined as how fast your website will take to fully load your website’s contents and resources. We have seen many developers struggle to keep their website load time at a minimum. You may find other tutorials which are suitable for you and the ones we are sharing works for us. There is no single solution for website speed as different websites are configured differently as they ran on different platforms.
However, do give our method a try and if it does work, we are happy for you! But in any case, if it doesn’t work for you, do feel free to contact us and we’ll be glad to help you with your website speed.
1. Eliminate Render-Blocking Scripts
Eliminating render-blocking resources are Javascript and CSS required by your website to display the content correctly. These resources are usually located at the <head> section of your HTML. Some Javascript and CSS are not necessary to load first and therefore, they should be “delayed” to make way for the more important codes to run.
This process can be tricky and require constant testing on your website to ensure that the eliminated Javascript and CSS does not affect your website’s User Interface (UI).
If your website is running on WordPress, you are in luck because there are tonnes of plugins for you to use. We have tested a few plugins such as W3 Total Cache, WP Super Cache, and Autoptimize.
The plugin that works best for us is Autoptimize. With the correct settings, you are able to completely eliminate all errors in Eliminating Render-Blocking Resources. If you decide to use Autoptimize plugin, be sure to get the Autoclear Autoptimize Cache. This plugin will automatically clear your cache when it reached a certain limit, which you can set (128MB, 512MB, 764MB or 1GB). Always start with the largest and work your way down if it doesn’t work for your website. We set our maximum cache files at 128MB.

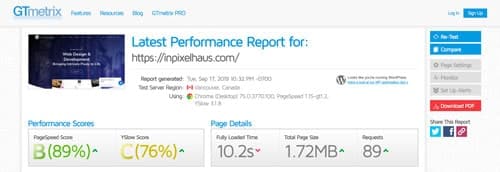
inPixelHaus Website without Autoptimize

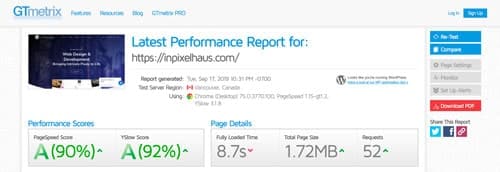
inPixelHaus Website with Autoptimize
The result depends on the setting of the plugin. Every website works differently, so be sure to check your website to ensure that each enabled items does not break your website.
2. Optimize Web Images
Most of the time, images are the main culprit for website’s speed. This is because users may not know the exact size of an image that is required and often, they upload large image files. Now you don’t have to worry because we will provide you with a general guideline.
Generally, your website is 1200 pixels wide (this is just a gauge as different website differs from each other), so your image width will be as follows:
- Full-Screen Image: 1200 pixels wide
- Half-Screen Image: 600 pixels wide
- A Third-Screen Image: 400 pixels wide
- A Quarter Screen Image: 300 pixels wide
- Thumbnails: 150 pixels wide
Now that you got some reference for your image width, it doesn’t stop here. If you are using Photoshop, you can save your image for website: File > Export > Save for Web
Note: If you are saving for JPEG, you can adjust the quality to 60%
Once you got your image exported, you still have to compress those images because at times, images stored data files which are useless to the web and it should be removed to save more bytes.
Apart from manually compressing your images, there are plugins which will automatically compress your images. We have tried both Smushit and ShortPixel Image Optimizer and they are great. Both plugins are free and have an option for you to go pro as well.
Smushit has no limit as to how many images it compresses but for the free version, you can only compress 50 images at a time. Meaning if you have 1,000 images, you have to click compress 20 times (1,000/50). However, if you do not have the time to do that, you can go for the pro option and it will compress all your images in a single click.
On the other hand, ShortPixel offers greater options such as compressing images and PDFs as well. The free version allows you to compress 100 images per month, meaning if you have 1,000 images, you have to do it across 10 months (1,000/10). You can speed up the process and compress more images in a month when you refer someone to use ShortPixel.
We would strongly recommend you to use ShortPixel. Even though there is a limit, the functions are great to optimize your images.
3. Minify HTML, CSS and Javascripts
Minify is a process of removing data which are not necessary, which can save your HTML, CSS, and Javascript a few kilobytes (kb), making your website to load faster. There are plugins which can help you to minify your files. But these software aren’t smart enough to detect whether a minified files will break your website. Therefore, we like to do it the traditional or you may call it the manual way.
BONUS TIPS
Most of the time, you’ll need a few plugins for certain pages such as Contact Form 7 on the contact us page. Installing a plugin may cause the CSS and javascript to be loaded on every page even when you don’t have any form on a particular page.
To prevent the CSS and javascript from loading on pages that don’t use the plugin, you can simply use a plugin called Asset CleanUp: Page Speed Booster
This doesn’t only prevent CSS and javascript from plugins but from other sources as well such as your website’s theme.
How Do I Use Asset CleanUp: Page Speed Booster?
After you have installed the plugin, go to the page where you would like to optimise. Scroll down to the Asset CleanUp: CSS & Javascript Manager section and you are able to see a list of files that are being loaded for that page.
If you already know that you don’t need a particular file, you can unload it immediately. However, if you are not sure whether that page is using that particular file, simply try to unload it and click on the “Preview” button to check if your page breaks. If it does, simply undo the last action and proceed to the next file.
This can be time-consuming to check each file but hey, it is a simple solution for your page speed problem.
Test Your Website's Speed
To have a fair analysis for your website speed, you can use GTmetrix. This is a free tool that will tell you what you should improve to get a better page speed and which files are slowing you down.
On top of that, you can also test the speed of your website on mobile. Google has introduced Test My Site – Think with Google. It will test your website’s speed on 3G network as Google predicted that the majority of the global users are still on 3G network until the year 2020. It will estimate the percentage of visitor loss due to loading time and provide you with an industry comparison. Now you know where you stand against your competitors!


Another rather important point on acceleration is optimization and compression of images on the site. You may manually optimize each picture (through Photoshop for example), or automatically (through special services). Here is an interesting article about it: https://optipic.io/en/blog/how-and-why-to-optimize-iamges-on-the-site/
Hi Alex,
Good point and thanks for sharing the article 🙂